‘The #1 choice of Fortune 500 corporations, major institutions, training organizations, and entrepreneurs worldwide for developing (and selling) their online courses,’ according to LearnDash.
It is widely regarded as one of the best LMS WordPress plugins available, with users ranging from huge corporations and colleges to individual course authors who want to operate their own eLearning courses. With the release of LearnDash 3.0, it has firmly established itself as the “go-to” WordPress LMS plugin.
There is no free edition, unlike numerous LMS plugins. If you want to use LearnDash to create your eLearning course, you’ll need to purchase a license from learndash.com.
If it doesn’t meet your expectations, you can receive a refund within 30 days. There is also an online demo available that allows you to put the system through its paces before making a purchase.
It takes two steps to create an online course using LearnDash. It’s vital to keep in mind that LearnDash isn’t a standalone learning management system.
While it has all of the features necessary to create an eLearning course, it must be used in conjunction with a WordPress website. This WordPress website will serve as the overarching “home” for your course.
This will feature your eLearning course’s branding, course information for prospective students, a contact page, and so on. In other words, just like any other business, you’ll need to create a ‘regular’ website for your eLearning firm. After that, you can install the LearnDash plugin and start configuring LearnDash.

It’s hard to choose the greatest LMS platform. Check Teachable it’s a good choice
Contents
Step 1 – Set up your WordPress Website
In this post, we won’t go over how to install WordPress. Hopefully, you’re using a hosting service that makes installing WordPress a breeze. As previously stated, you should utilize a WordPress host that can handle LearnDash.
LearnDash is a resource-intensive plugin by design, and ‘cheap and cheerful’ hosting will struggle to handle it if you have numerous people viewing your course at the same time.
If you’re serious about establishing an eLearning business or setting up an LMS for a university or other educational institution, you’ll want to carefully explore your WordPress hosting options.
We may begin setting up your WordPress website that will hold your eLearning course once you’ve completed your WordPress installation.
Choosing a Theme
Most WordPress themes that are coded according to WordPress standards function with LearnDash. This is great news because it expands your design possibilities and allows you to potentially integrate LearnDash into an existing WordPress site.
If you’re starting from scratch, pick a theme that closely resembles the design of your company (or educational establishment, etc.).
LearnDash suggests a few themes that they know are compatible with the plugin. If you’re short on time, LearnDash has collaborated with the creators of the Astra Theme, which is known for its great performance and loading speed.
In their site starting library, they now have a LearnDash-specific template, which we’ll be using in this demo.
Let’s get started!
Set up your WordPress Website
Once you’ve purchased a copy of the LearnDash plugin, log in at https://support.learndash.com/account
- Head to Appearance > Themes > Add New.
- In the search bar located top right, search for ‘Astra’.
- Install this free theme and activate it.
Once that’s done, you’ll now need to install LearnDash along with a couple of other items.
- Head to Plugins and then install LearnDash which you downloaded earlier from your LearnDash account.
- It’s also recommended that you install the LearnDash Course Grid Addon. You’ll need an active license for this to work. It can be downloaded here.
- Finally, install and activate the LearnDash WooCommerce integration (needed if you want to accept payments for your course). Download this from LearnDash here.
- You will also need to install the free WooCommerce plugin. Search for this in the plugin repository and install.
After that, you may import the free Astra LearnDash theme, which will help you get a head start on developing your website if you don’t already have one.
- Go to the Appearance tab and select ‘Astra Options’ from the drop-down menu. Within this, there is a tab labeled ‘Starter Templates.’ You’ll be brought to the Starter Templates page after clicking the prompt to activate the starter templates (now accessible via the Appearance menu). If you’re asked which website builder you’d want to use, you can select any of the available alternatives. If you’re used to using Elementor, for example, use it. We’ll use the default Gutenberg site builder in this example.
- You’ll find a template called ‘LearnDash Academy’ if you search for ‘LearnDash.’ Click ‘Import Complete Site,’ then wait for it to download and install. Note that this only applies if you started with a blank site and want to utilise the Astra LearnDash theme for your eLearning website’s design!
- When the site has been imported, you will be alerted. You’ll now have a fully built eLearning website that you can edit to match your own branding and content needs with very little effort on your part.
Walking through the process of changing the site’s design is beyond the scope of this article. The new Gutenberg editor is simple to use, and the Astra theme is well-designed, making customization a breeze.
If you don’t want to put much effort into the design, merely updating the logo and text will provide you with a professional-looking website from which to launch your course.
Step 2 – Setup LearnDash

LearnDash is a well-supported plugin, and in addition to the information in this post, you’ll find lots of support for setting up your LearnDash course in their support center or by viewing the video lessons. The ‘LearnDash Bootcamp’ can be accessed by entering the LearnDash LMS menu, which is now accessible from the wp-admin menu on the left-hand side of your WordPress site.
Entering your license key and email address is the first step. Your license key can be found in the LearnDash Dashboard’s ‘My Account section.
After you’ve done that, you may proceed to the next steps in the LearnDash setup process.
LearnDash Settings
When you’ve registered your LearnDash plugin, the first thing you’ll probably want to do is go to the ‘Settings’ tab. This is LearnDash’s command center, where you can customize everything from the colors used on your site to PayPal settings. You may even change the logo for your website here.
You might want to look into the ‘Custom Labels’ page. We all have various ways of articulating comparable concepts, and the Custom Labels section allows you to change how your course’s contents are described. The default label for Courses, for example, is ‘Courses.’ However, you might prefer ‘Lectures.’ Update as needed to meet your specific requirements.
Courses, Lessons, Topics & Quizzes Overview
We’re finally ready to start working on your first course. Before we get started, let’s go through some of the terminology used in LearnDash to see how it connects to course structure.
Courses: Courses are the ‘containers’ that contain the lessons, quizzes, and subjects. You may decide to create only one course that covers the topic you wish to teach (for example, ‘How to read music). You might, however, want to build many courses.
These separate courses may cover diverse subject matter or just investigate the same subject in varying depths. Courses are also beneficial since you can opt to take one course free while charging for another.
Offering a free ‘teaser’ course is a terrific method to encourage people to sign up for your website and allows you to demonstrate the quality of your course material without requiring the prospective consumer to pay right away.
Lessons: Lessons are where you create the content for your course. Images, text, PDF files, audio files, and videos can all be included in the course content. You can choose to have only one or two long lessons or several lessons. These lessons are organized in your course such that the student progresses through them until the course is completed.
Topics: If your classes are complex and contain a lot of content, you may want to use Topics to divide them down further. Subjects must be introduced to lessons (a course cannot be entirely made up of topics). If adding another degree of hierarchy seems too complicated, you may always break your lessons into sections using section titles.
Quizzes: Quizzes are an excellent approach to assessing your students’ comprehension of the subject that has been taught. There are now a variety of quiz types available in LearnDash 3.0, including multiple choice quizzes, sorting question quizzes, free choice quizzes, and more. Quizzes are usually given at the conclusion of a lecture or a course.
Setting up a LearnDash Course
Courses are the containers that carry all of your lessons, as previously stated. Before you begin creating your course, you must first decide how you want to arrange your overall eLearning experience.
Do you want numerous courses that cover the same topic or one course with many lessons, for example? It’s time to start developing once you’ve made your decision.
To do so, go to wp-admin and click the Courses tab under the LearnDash submenu. Select ‘Add New’.
Enter the course title, followed by the course description. There are several options on the right-hand side, including the opportunity to add course categories. There are two types of courses in this example: free and paid.
After you’ve filled out the basic course information, you may move on to the course builder, which can be found in the menu at the top of the course page.
You will now begin to add Lessons to this section. To save your Course for now, click Publish/Update and then click the ‘Back to Courses’ button in the top left corner of the screen.
Setting up a LearnDash Lesson
The actual delivery of your course information will take place in lessons. In the LearnDash submenu, select ‘Lessons’ and then ‘Add New.’ A new post will appear, and it is here that you may get started.
You have complete control over how many lessons you want to include in your course, as well as the content of each lesson. To present the information your students require, you can add as much text, video (embedded from a hosting site such as Wistia), and images as you need.
The Settings tab allows you to apply a variety of additional variables to each course. A Forced Lesson Timer, for example, prevents a student from going on to the next lesson until a particular amount of time has passed. A more detailed description of these functionalities can be found in the LearnDash Knowledge Base.
Once you’ve finished creating your lesson(s), publish/update them just like any other WordPress post/page.
Setting up a LearnDash Quiz
Quizzes, like Courses and Lessons, are accessed through the LearnDash menu sidebar’s sub-menu. To get started, click this to open the module.
To begin, go to the ‘Questions’ option and create the questions for your quiz. You’ll need to choose the question type (single choice, fill in the blank, etc.) from the sidebar menu.
You can turn your questions into a quiz after you have them. Click the Quizzes submenu, then ‘Add New,’ and add some basic information about your quiz in the form of a title and description.
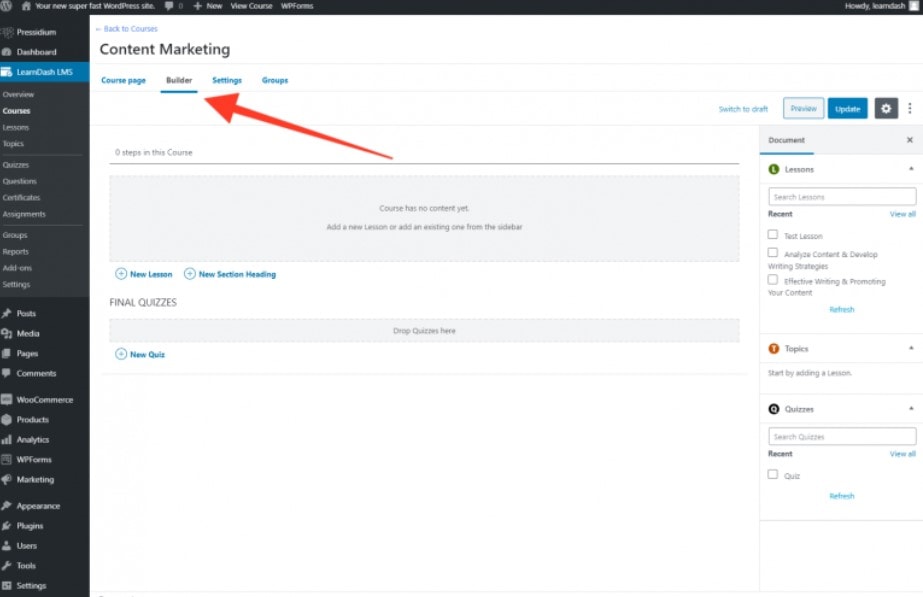
After that, navigate to the ‘Builder’ tab. See how the LearnDash builder for quizzes and courses works in the following section of this introductory guide.
The LearnDash Builder

Conclusion: How to Setup LearnDash
In this tutorial, we’ve merely touched on the very fundamentals of setting up a LearnDash course. There are many alternatives accessible to you, but hopefully, this post has provided you with the basics to get you started, which is frequently the most difficult part of setting up a LearnDash LMS. More complex options become evident after you understand the basics.
What’s cool about LearnDash is that when you pair it with a starter theme like Astra, you can go from having no eLearning website to having a fully functional LMS system in just a few hours. LearnDash 3.0 is a fantastic program.
A large number of high-profile users attests to this, and with a little investment, it may be the ideal LMS system for your needs.
Do you want the best LMS platform and get a 50% discount? To get discount coupons and save money, click here
Quick Links: