In our earlier articles, we showed C programming on Linux. The second part of the tutorial covers C++, Java and .Net programming basics, including installation, compiling your first program and running your first program on Linux.
If you seriously want to learn how to use Linux with your favorite languages such as C, C++, .NET and Java, then you must give this advice at least a full week trial before deciding against it. Otherwise, you will be giving up too early, and you could miss out on what others are achieving with this open source operating system that is finding increasing use throughout the internet world.
Why is it becoming so popular? Easy:
- It is Free!
- It is Powerful!
- It is Easy to learn!
Linux is an open source platform, and this does not only mean that it is free for you to use, but also that many software firms are developing programming languages, applications and copies of established program suites to suit the Linux OS.
However, if you are reading this then you are likely an experienced technician wanting some technical information about Linux and how to use it as a platform for your applications using C++, Java and more. Here is how to use C++ on Linux:
Contents
C++ Programming on Linux
If you understand C, then coding, compilation and the execution cycle is similar, except the compiler is not gcc, but g++. You should first check that it is installed on your computer or server by running the command that you would use for gcc – you will find that in the first part of this tutorial.
Then check if the standard C++ library is installed: libstdc++ and if it is not, then make sure you install it. Once you have both installed, open up gedit and type this simple C++ program:
[c language=”++”] #includeusing namespace std;
int main ()
{
cout << “Hello, World!” << endl;
return 0;
}
[/c]
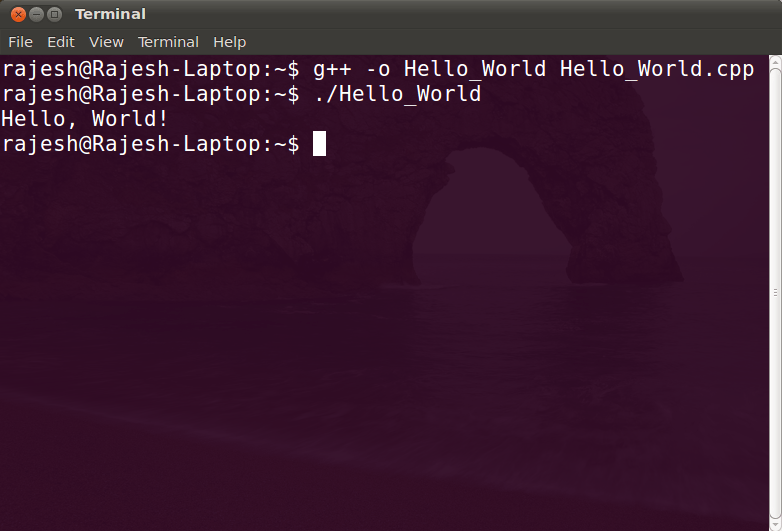
Now save this file as: Hello_world.cpp. Compile and execute the file as:
$ g++ -o Hello_World Hello_World.cpp

$ ./Hello_World

Hello World
If you have been able to compile these programs successfully, you should now start to write and compile some of your C or C++ assignments using gcc or g++ respectively. If you have any problems doing this then let us know in form of comments below.
Java Programming on Linux
When programming on Linux with Java you can utilize the same tools that you use on Microsoft Windows: the Sun Java Development Kit. Here’s how:
Download the installer from the .bin file (equates to the .exe file on Windows). Do not use the *rpm.bin file. When download is complete:
- a) cd to the directory where you downloaded the file.
- b) Use the commands:
$ chmod +x jdk-6u18-linux-i586.bin

$ ./jdk-6u18-linux-i586.bin
- If the file names are different to the above, it will only be due to differences in the version of the JDK you are using. It doesn’t matter.
The first line of codes enables the installer to be executed, and the second line actually executes it.
You should now see “Sun Microsystem, Inc. Binary Code License Agreement” on your screen with the option to accept it – do so! The Java Development Kit should now begin to extract.
Once completed, the installer will disappear and you will see a subdirectory appear inside your current directory named ‘jdk1.6.0_18’. This contains the bin subdirectory containing the Java Compiler (javac), java (the Java interpreter) and other files. You are now all set to go and write you first Java program.
Start up gedit and start with this Java code:
[java] import java.lang.*;class Example {
public static void main(String args[]) {
System.out.println(“This is a simple Java program.”);
}
}
[/java]
Save the code as Hello_World.java, then compile and run it as follows:
$ /home/rajesh/jdk1.6.0_18/bin/javac Hello_World.java

$ /home/rajesh/jdk1.6.0_18/bin/java Hello_World

Hello World!
Note: In The first two commands immediately above include the full path to the location of the javac and java executables. Your paths will be different so use your own.
This how to compile and run your first Java programs on the Linux OS.
OpenJDK
OpenJDK is a GPL-licensed open source implementation of the Java Standard Edition. You can install OpenJDK from your Linux distribution’s package manager. See help for installation instruction.
Java Program Execution

In Java the executable file is a bytecode file which is to be executed on the Java Virtual Machine (JVM) which acts like a processor as well as an Operating System (known collectively as a Platform). This means that the executable files do not rely specifically on Linux or any other platform for their operation, but can be run from any platform where the appropriate JVM is available.
Java Environment:
The following diagram depicts a typical Java environment:
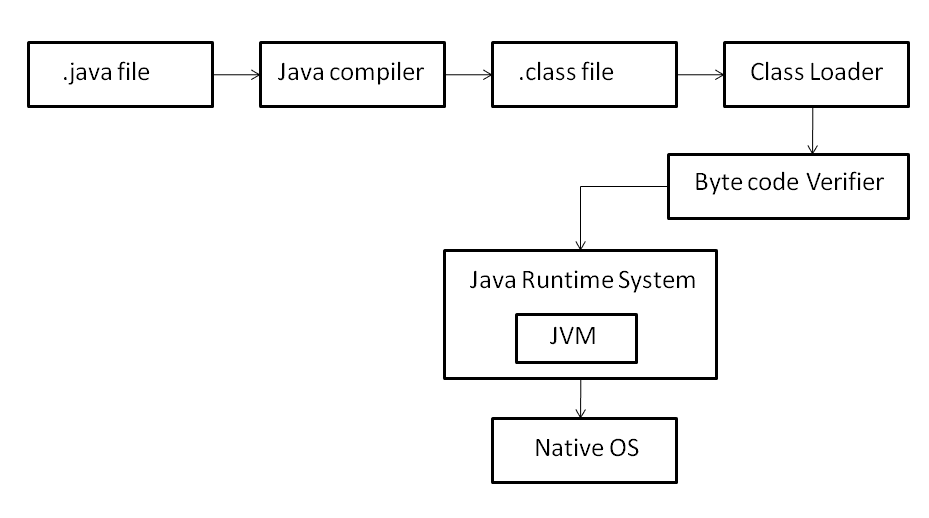
The Java source file is stored as a ‘.java’ file and is compiled to get an executable ‘.class’ file. A ClassLoader is use to download the executable file, the bytecode of which is then interpreted, a process which makes the file understood by the underlying processor which executes the file instructions.
The so-called ‘native code’ that the processor understands is never stored, and has to be generated from the .class file each time. This naturally extends the processing time over the shorter time had the process be written in C, but Java overcomes this to an extent by including a ‘just-in-time’ compiler with the interpreter.
The JIT compiler enables all the frequently used class files to be compiled into native code just the once, rather than each time they are used. This improves the speed of execution of the commands to an acceptable level. The stored native code last only for the lifetime of the application.
The API provided by the language is constantly available to the JVM, and the entire package, excepting the compiler that generates the .class file from the .java file, is referred to as the Java Runtime Environment (JRE).
.Net Programming on Linux
If you want to do .net programming on Linux then you can with help of MonoDevelop. This is an open source project (sponsored by Novell) that allows you to run .Net applications on Linux (as well as Unix, Mac OS X, Solaris and even Windows).
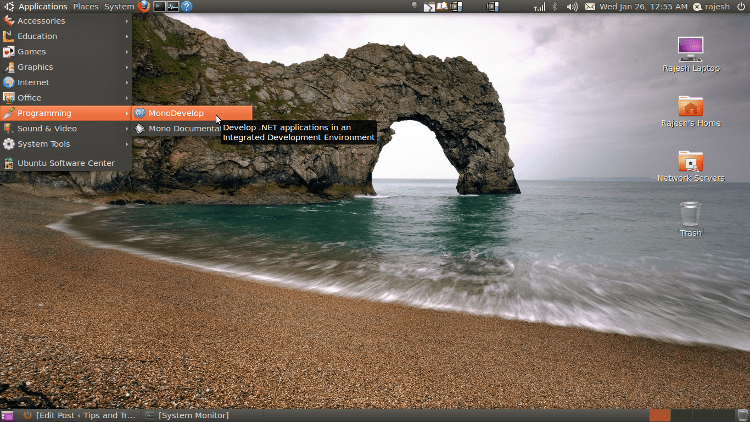
It is a GNOME IDE primarily designed for C# and other CLI (.NET) languages. It supports C, C++, C# (1.0, 2.0 and 3.0), Vala, Boo, Java, Nemerle, ILasm, ASP.NET and VB.NET languages. To access it, visit the Mono download page and find the version you need for your distro. Once you’ve installed MonoDevelop, you can get access to MonoDevelop in Applications -> Programming.
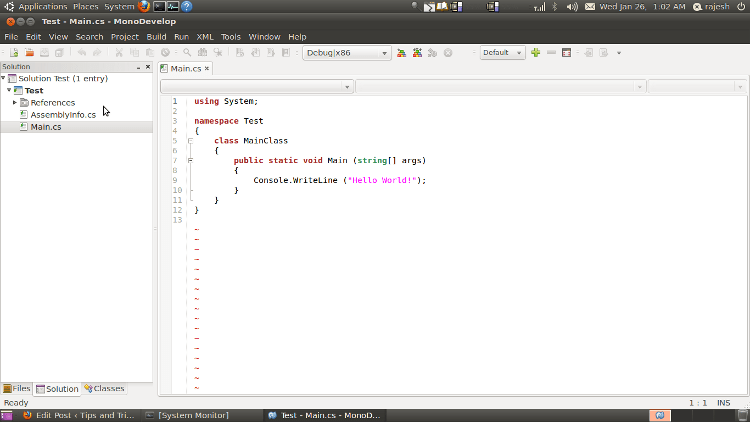
type this simple C# program:
[c language=”#”] using System;namespace ConsoleApplication1
{
class Program
{
static void Main(string[] args)
{
Console.WriteLine(“Hello World”);
}
}
}
[/c]
After writing your program press F5 to run it.
Using your Favourite IDE on Linux
If you have used any IDE’s for your development needs, you have great news! Two very popular IDE’s, NetBeans and Eclipse, also have Linux versions and both support C, C++ and Java development.
For GNOME–based Linux distributions, Anjuta DevStdio is another powerful IDE for C, C++ and Java (and other languages). All three should be available for you in your distribution’s package manager.
Having read all of the above carefully, if you still have questions, concerns or suggestions, feel free to drop a comment to make this tutorial better! We hope that you have enjoyed this long and resourceful article. If you like it please retweet, and share it with your friends on Google+.