Version controlling is very common term in software industry and version controlling software like Git and SVN are widely used for keeping track of changes in projects. Many developers face problems while using Git and GitHub, so we decided to share an article on Git. In this tutorial, we will be learning the basics to use Git, which involves creating and initializing your repository, committing the code (after making changes), and then pushing your changes from your local to online repository.
Contents
What is Git?
Git is distributed version control and source code management software. It is used to track state, history and the integrity of the source tree. Hence, it is a much useful tool for every developer.
Why use Git?
It works locally by default, so every working directory is a full-fledged repository with complete history and full version tracking capabilities, so it is not dependent on any central server.
When merging, Git’s extensive use of stored history comes handy to make much better informed decisions, which leads to fewer conflicts. Finally, Git is a distributed as free software under the terms of GNU General Public License.
Then what is Github?
Github is a web-based hosting service for software projects that use Git revision control system. As of now, Github is the most popular open source-code repository site. It offers both paid plans for private repository, and free accounts for open source projects. Therefore, if you have not signed up for Github, I highly recommend you do so at https://github.com/signup/free
Setting up Git on Windows
Download the Git setup for Windows, here. Git is the heart of Github, which is an open source version control system. It is created by the same team that created the Linux. And it is responsible for anything related to Github, that happens locally on your machine.
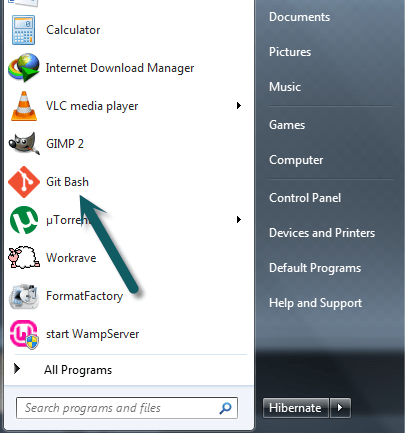
Once, Git has been installed locally, you need to set it up before you can start creating repositories. Now fire up the Git bash (from the Start button).
Then you need to tell your username so that it can label your commits:
[html] $ git config –global user.name “Your Name Here”[/html]
Enter your email, so that Git can use it to associate your commits with your Github account. (Use the same email which you’ve registered on Github)
[html] $ git config –global user.email “[email protected]”[/html]
Now you’ve finished setting up Git on your local machine. Now let’s create our first repository and make first commit.
1. Creating a Repository
You can create a repository on Github at, but only after signing in using Github account. If you do not have an account, you can create one at github.com
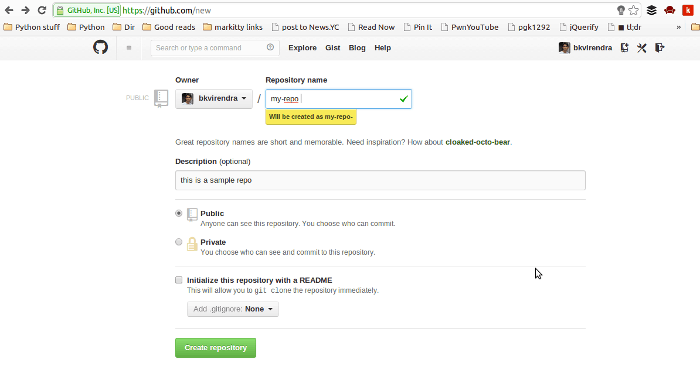
Provide a name for your repository, and some description. You can choose to make your repo Public or Private. (Public repositories are accessible by anyone, i.e. anyone can access the source code, while only you have the access to or anyone you share it with, have the access to the source code for Private repositories)
2. Setting up Your Repository on Local Machine
Once you have created a repository on GitHub, the next part is about doing the same on your local machine (please make sure that you have successfully configured Git bash). You can also refer to Github’s Help Docs, for more help with setting up Git.
Now you can start by creating a directory on your file-system named `my-first-repo` Add an `index.php` file in your directory. `index.php` and add the following code to it:
[php] <?phpecho “Hello git”;
?>
[/php]
Now initialize git in your directory:
[html] $ git init[/html]

Now you have initialized git in your directory. Then lets add these file paths (from our directory), for Git tracking.
(git add: It stages the content you want to snapshot)
[html] $ git add .[/html]

Now let us make our first commit with:
[html] $ git commit -m “my first commit”[/html]
(git commit: It creates the snapshot of the staged content, and records your username and email address with each commit you make)

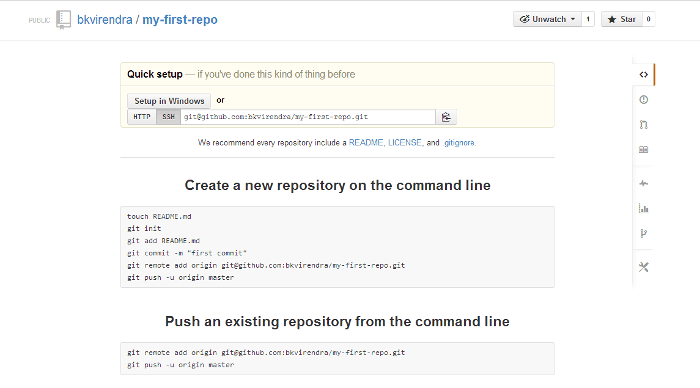
This will create a snapshot of our staged content. Now since, we have to share our repo with others, we have to add on a remote host. This is done using `git remote add`. We have already created the repo on Github, now we just need to copy the given url, in our case it is `[email protected]:bkvirendra/my-first-repo.git`. Now lets add this to our project, so we can push changes to it, and pull updates from it.
[html] $ git remote add origin [email protected]:bkvirendra/my-first-repo.git[/html]

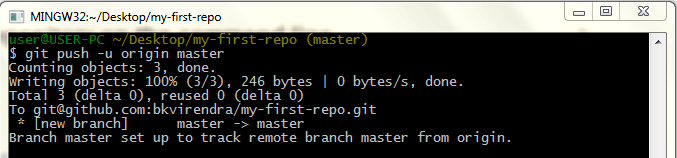
Now we sharing our commit with others, we have to push our changes to our remote repository (hosted on Github). This will create our branch on the remote repo. Lets push to our `master` branch on our remote repo.
[html] $ git push -u origin master[/html]
The demo repository in the above tutorial is available at . In case if you have any issues with ssh keys please refer https://help.github.com/articles/generating-ssh-keys. For additional Git related reference please refer http://gitref.org/.
Test Git without Install
If you do not want to install Git on your PC but want to learn it, we can prefer you an awesome web-based tool! Code School has developed this tool and it is now available for all users. In the website, you can see a section to give git-based commands. Once you have entered correct commands followed by Enter key, corresponding actions will appear in the section placed below the command section. Hence, it is a good way to learn Git online without facing the hassles of installation! If you’re facing any problems while using Git or GitHub let us know in form of comments below.